Showing posts with label learning to draw. Show all posts

Sunday, 7 September 2025

The Elements of Drawing - Exercise 2 (Take 2)

Mistletoe
The Elements of Drawing - Exercise 2

Ink on Paper
23cm x 16.5cm (9" x 6.5")

This is my second go at Exercise 2 from John Ruskin’s The Elements of Drawing (see The Elements of Drawing - Exercise 2). I followed the same variation of the exercise as last time:

Chose an illustration from British Phænogamous Botany; Or, Figures and Description of The Genera of British Flowering Plants

Viscum_Album, Mistletoe

Copied the outline as closely as I could with a soft pencil on to a piece of scrap paper.

Mistletoe
The Elements of Drawing - Exercise 2

Pencil on Paper
23cm x 16.5cm (9" x 6.5")

Used Gimp (a free image editing package) to compare my drawing (in red) with the original.

Assessing Outline 1

Corrected my outline based on the feedback from the comparison. 

Made another comparison and repeated the correct and compare steps until I reached a reasonable level of accuracy (this is my fifth and final version).

Assessing Outline 5

Transferred my drawing to a clean piece of paper (using a lightbox) and then drew over it in ink (the outline at the top of the post is the result).

The exercise provides good practice for drawing by eye. It offers an opportunity to think about and test different strategies to obtain an accurate result.

For the last step, Ruskin suggests:

rest your hand on a book about an inch and a half thick, so as to hold the pen long; and go over your pencil outline with ink, raising your pen point as seldom as possible, and never leaning more heavily on one part of the line than on another.

I can’t get on with resting my hand on a book. In my first attempt I contrived a hand position which allowed me to “hold the pen long” while lightly resting my wrist on the paper. This time I didn’t rest my hand on anything. I tried to draw from my shoulder and maintain the slow control that Ruskin demands. The crux (for me) is to hold the pen so that it barely touches the paper. This allows it to easily move in any direction without catching on the paper. I am still using a fineliner - which is cheating because it is far move forgiving than a nib and less likely to catch or cause a blot if you hesitate.

Sunday, 17 August 2025

Drawing and Painting the Landscape - Scumbling and Drybrush

First Light
Acrylic on Paper
19cm x 19cm (7.5" x 7.5")

I combined lesson 41 and 42 of Drawing and Painting the Landscape by Philip Tyler.

Lesson 41 is about Scumbling - the application of paint as a broken layer. Philp suggests scrubbing the paint on to the surface. This:

"causes the paint to go on really thinly, making for an optically porous surface (the ground comes through)."

Other writers describe scumbling techniques using “a drybrush and a loose hand” or rags.

Lesson 42 is about Drybrush – carefully dragging a brush with almost dry pigment over the painting surface to create a broken layer of fine marks.

Philip differentiates drybrush as being more controlled than scumbling. Both techniques create the impression of texture and depth by building up broken layers of paint. They can be used to achieve a blurred or soft appearance. 

I’ve experimented with drybrush in watercolour to give the impression of textures such as tree bark (see Branches, Roots, Hardwood Tree Bark, Conifer Tree Bark, Wood Grain, Volcanic Rock and Silver Birch).

In watercolour you are helped if you use a rough paper because the brush catches and leaves paint on the ridges, but not in the valleys. I am finding it trickier with acrylics because I am painting on a smooth surface. I suspect the trick is either to use a rougher surface or to roughen the surface with an unevenly applied gesso or impasto layer.

In the picture at the top of this post, I started off with scumbling and progressed towards drybrush in later layers, particularly on and around the boats.

Philp suggested experimenting with a dark ground.

Dark Ground and Drawing

I like the effect of the white pencil drawing on the umber background. I nearly decided this was finished. 

Sunday, 27 July 2025

The Elements of Drawing - Exercise 2

Wild Tulip
The Elements of Drawing - Exercise 2
Ink on Paper
25cm x 10cm (10" x 4")

Exercise 2 from John Ruskin’s The Elements of Drawing is about copying an outline drawing of a plant.

Ruskin recommends Baxter's British Flowering Plants.

I found on online copy of British Phænogamous Botany; Or, Figures and Description of The Genera of British Flowering Plants by William Baxter, but it’s not very inspiring. The illustrations aren’t just outlines. Most of the drawings have hatch line shading and are partially obscured with watercolour. 

The exercise has three almost distinct parts. The instructions for the first part are:

Copy any of the simplest outlines, first with a soft pencil, following it, by the eye, as nearly as you can; if it does not look right in proportions, rub out and correct it, always by the eye, till you think it is right.

I picked an image of a Tulip. 

Tulipa Sylvestris, The Wild Tulip

This is my first attempt at the outline:

Wild Tulip - Outline 1
The Elements of Drawing - Exercise 2
Pencil on Paper
25cm x 10cm (10" x 4")

The next step is 

lay tracing-paper on the book; on this paper trace the outline you have been copying, and apply it to your own; and having thus ascertained the faults, correct them all patiently, till you have got it as nearly accurate as may be. 

Instead of using tracing paper I overlayed the two drawings in Gimp (a free image editing package). This is my first outline (in red) superimposed on the original.

Assessing Outline 1

It took me 5 passes to get to this.

Assessing Outline 5

This is as accurate as I am going to achieve. Eventually, you get to a point of diminishing returns because depending on how you line up the drawings a part that looked good in the previous comparison, suddenly looks worse.

The third part is to draw the image in ink:

take a quill pen, not very fine at the point; rest your hand on a book about an inch and a half thick, so as to hold the pen long; and go over your pencil outline with ink, raising your pen point as seldom as possible, and never leaning more heavily on one part of the line than on another.

As soon as you can copy every curve slowly and accurately, you have made satisfactory progress; but you will find the difficulty is in the slowness. It is easy to draw what appears to be a good line with a sweep of the hand, or with what is called freedom; the real difficulty and masterliness is in never letting the hand be free, but keeping it under entire control at every part of the line.

The point of the exercise is:

The power to be obtained is that of drawing an even line slowly and in any direction

The pen should, as it were, walk slowly over the ground, and you should be able at any moment to stop it, or to turn it in any other direction, like a well-managed horse.

Ruskin bemoans:

 In most outline drawings of the present day, parts of the curves are thickened to give an effect of shade; all such outlines are bad,

I embraced the aim of the exercise, but I balked at the use of a quill and resting my hand on a book. I tried a variety of fountain pens and fineliners and contrived a hand position which allowed me to “hold the pen long” while lightly resting my wrist on the paper. The image at the top was drawn with a fineliner - which is probably cheating. My plan is to get the hang of using a fineliner for the exercise and then try using a dip pen.

Sunday, 13 July 2025

Drawing and Painting the Landscape - Pointillism

Hurst Point Lighthouse
Acrylic on Paper
19cm x 19cm (7.5" x 7.5")

Lesson 40 of Drawing and Painting the Landscape by Philip Tyler begins with an explanation of Pointillism. It’s a technique in which you apply the paint as small dots of pure colour. The viewer's mind optically blends the colours which makes them appear more vibrant.

It’s a time-consuming technique because it requires the use of small brushes to create the tiny dots. It’s not something I have much enthusiasm to try. Fortunately, Philip suggests “By increasing the size of the brush and mixing other hues the technique of dabs and dashes can be explored.” This seemed more achievable in a reasonable amount of time and also something that might fit into the way I want to paint.

This was a great lesson. I learnt more about working with acrylics, both in the actual painting and in the whole process of getting set up and cleared away. Importantly, I also started to embrace the benefits of acrylics. One of which is you can leave them to dry and paint over things to correct mistakes and to refine the picture.

As well as painting, I am working on composition using the ideas that Ian Roberts shares on his Mastering Composition YouTube channel.

I painted a different view of the lighthouse back in 2012 (see Capturing Light and Negative Painting).

Sunday, 29 June 2025

The Elements of Drawing - Exercise 1

The Elements of Drawing - Exercise 1
Ink on Paper
18cm x 15.75cm (7" x 6.25")

I seem to be “drawn” to old art instruction books. John Ruskin (1819-1900) wrote "The Elements of Drawing" in 1856. It’s amazing to follow lessons written by a contemporary and friend of J. M. W. Turner (1775-1851).

I like that Ruskin is more interested in helping his readers to learn to love nature and appreciate great art than he is in teaching them to draw, but the book won’t be to everyone’s taste. The writing and overall tone is old fashioned and authoritarian.

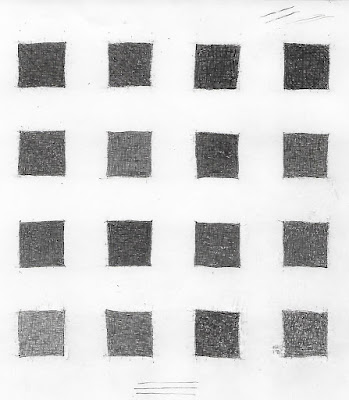
The first exercise is to create blocks of smooth tone using a fine pointed steel nib. Ruskin recommends using “one of Gillott's lithographic crowquills”. Surprisingly, 170 years later, you can still buy these. I am using the 659 mapping nib which seems very fine and very stiff.

One of Gillott's lithographic crowquills

You draw boxes and fill them in with crossed lines “so completely and evenly that it shall look like a square patch of gray silk or cloth, cut out and laid on the white paper”.

If areas of the square are too light, you darken them by drawing more lines or dots. If areas of the square are too dark, you “use the edge of your penknife very lightly, and for some time, to wear it softly into an even tone”. 

This is all more difficult than it sounds. The nib and the knife are both difficult to master. Every time you darken an area by adding more ink, the overall tone of the square gets darker. Every time you try to lighten the tone with the penknife, the paper gets rougher and becomes more unpredictable in how it takes ink. Eventually the paper becomes so rough that further improvement is impossible. 

It is difficult to know whether you've successfully completed the exercise. Initially, I thought my efforts were relatively poor when compared with the example for the exercise. 

The Elements of Drawing - Exercise 1

But the example is a dark square, which Ruskin acknowledges is easier to achieve than a lighter one. I flicked ahead to Exercise 3 in which you create a greyscale. 

The Elements of Drawing - Exercise 3

Parts of this look rougher than my efforts, so I’m calling Exercise 1 done and I will reevaluate my progress when I try the greyscale in Exercise 3.

Sunday, 8 June 2025

Illustrated Journaling


Rudolf
Watercolour & Ink
Stillman & Birn Alpha Series Sketchbook
14.0 x 17.8cm cm (5.5" x 7.0")


An illustrated journal is a diary in which you record your life in both words and pictures. Liz Steel (SketchingNow) and Danny Gregory (Sketchbook Skool) both keep and recommend illustrated journals. 

No. It's a Pen Knife!
Watercolour & Ink
Stillman & Birn Alpha Series Sketchbook
14.0 x 17.8cm cm (5.5" x 7.0")

Until now, I haven’t included text with my sketches because my main reason for sketching is to practice drawing and painting. I wanted to create perfect little pictures, not to document my life.

Doris Free Weekend
Watercolour & Ink
Stillman & Birn Alpha Series Sketchbook
14.0 x 17.8cm cm (5.5" x 7.0")

This year, I’ve embraced the addition of text. My hope is it will make me less precious about creating pristine sketches. This will take the pressure off starting a drawing and result in me sketching more frequently. I also enjoy writing, so it is a welcome addition.

Pencil Full Of Lead
Graphite Pencil
Stillman & Birn Alpha Series Sketchbook
14.0 x 17.8cm cm (5.5" x 7.0")

I’m using a small sketchbook; each page is only 8.9cm x 14.0cm (3.5″ x 5.5″). It’s smaller than I enjoy using, but the benefits are it’s small enough to fit in a pocket and to go unnoticed when it’s in use. The small size should also help me to stop fussing over details.

Icing
Ink
Stillman & Birn Alpha Series Sketchbook
14.0 x 17.8cm cm (5.5" x 7.0")

 I’m also painting over the middle of the double page spread. This is another strategy to be looser and to reduce the expectation that each sketch needs to be faultless. You have to accept less than perfection when you’re drawing and painting over a fold.

Sunday, 23 March 2025

Drawing and Painting the Landscape – Alla Prima

Pensile Road
Acrylic on Paper
19cm x 19cm (7.5" x 7.5")

"Alla prima" is Italian for "at first" or "at once". In oil painting terminology it means completing a painting in one sitting, applying the paint wet-on-wet. It results in pictures that are spontaneous and expressive. It is also the subject of Lesson 39 of  Drawing and Painting the Landscape by Philip Tyler.

Phillip suggests placing the paint carefully and being forthright in your mark making. The idea is to get the paint down and leave it. The more you mess around with paint, the muddier the colours become. By putting the paint down and leaving it, you retain the freshness of the colours and the expressiveness of your original marks.

I cross referenced Phillip's guidance with advice from: 

All three agree on the importance of slowing down and painting mindfully – making sure you have mixed the right colour and you are putting it exactly where you want it.

I am cutting myself some slack with this picture because it is only my second painting in acrylics. I am making life additionally difficult by trying to work out how to use acrylics like oil paints. Currently, I am struggling with balancing thickness and opacity. I’ve thought about painting some experimental swatches to learn more about how the paint behaves, but painting pictures is more fun and helps to practice other skills as well.

Sunday, 2 March 2025

The Creative License

20. Make It Yours
The Creative License
Gouache & Watercolour Pencil
Stillman & Birn Alpha Series Sketchbook
16.0cm x 16.0cm (6.25" x 6.25")

 On January 1, I started Danny Gregory’s course The Creative License

4. Childs Play
The Creative License

Graphite Pencil
Stillman & Birn Alpha Series Sketchbook
28.0cm x 20.0cm cm (11" x 8")

The course is billed as 

Your invitation to reconnect with your creativity. It’s not about mastering technical skills or creating flawless masterpieces. It’s about discovering the artist inside you and giving yourself permission to create—without fear, judgment, or expectations.

5. Reinventing Our Tools
The Creative License

Watercolour, Ink and Wax Crayon
Stillman & Birn Alpha Series Sketchbook
20.0cm x 28.0cm cm (8" x 11")


Danny based the course on his book of the same name (The Creative License). He expanded the concepts from the book into 31 lessons, one for each day of the month.

11. It's Complicated
The Creative License

Watercolour & Ink
Stillman & Birn Alpha Series Sketchbook
28.0cm x 20.0cm cm (11" x 8")

The lessons are about:

  • Overcoming the fear and self-doubt about making art.
  • Experimenting, trying new things and embracing joyful, messy, playfulness.
  • Integrating creativity into your daily life.

14. Scent & Art
The Creative License
Watercolour, Gouache, Marker and Wax Crayon
Stillman & Birn Alpha Series Sketchbook
28.0cm x 20.0cm cm (11" x 8")

The course was a revitalising start to the year. Everything was going well until the 29th, when I slipped on some icy decking, tore a hamstring (badly), blacked an eye and gave Elaine an unpleasant shock when she found me unconscious at the bottom of the stairs. It’s taken a while, but I'm recovering and finished the last few exercises.

29. Integration Challenge
The Creative License

Gouache
Stillman & Birn Alpha Series Sketchbook
16.0cm x 16.0cm (6.25" x 6.25")

The pictures on this post are my favourite pieces from the course. The one at the top and this last one are loose copies of Kurt Jackson pictures. They are significant because they don’t look like anything I’ve created before. They indicate a direction I want to explore.

Sunday, 19 January 2025

Foliage

In The Woods At Night
Watercolour on Paper
16.5cm x 24.5cm (6.5" x 9.5")

Foliage is the fifth topic in the Tree Techniques chapter of Creating Textures in Pen & Ink with Watercolor by Claudia Nice. 

In one of her examples she shades around some leaves to make them pop out of the picture. This reminded me of a layering technique John Lovett explains in his Textures, Techniques & Special Effects for Watercolor.  He uses negative painting to create the impression of layers of objects stacking on top of each other. Your start with a light wash, then you paint everything that’s not in the top layer with a slightly darker wash, then everything that’s not in the top 2 layers with a darker wash again, and so on. Once you have built up the layers, you go back to add texture and details.

The picture at the top of the post is based on 8 layers. Before I started painting, I painstakingly worked out the shape of what I was painting in each layer. 

In The Woods At Night - Layer 3

This is the third layer. The black is the area that I am not painting over. 

In The Woods At Night - Layer 4

This is the 4th layer. You paint less and less in each layer. Each time you paint an object it gets darker and recedes further into the shadows. I've been meaning to try this for years, so it's exciting to finally give it a try.

Sunday, 6 October 2024

Drawing and Painting the Landscape – Oil Painting

Sunflowers
Acrylic on Paper
23cm x 14.5cm (9" x 5.75")

Spoiler - This isn’t an oil painting or a landscape. 

Lesson 38 of  Drawing and Painting the Landscape by Philip Tyler is about oil painting. Philip provides a beginner’s guide to oils and suggests a materials list.

I am wary of using oil paints because of the toxic fumes from their traditional solvents. Research reveals a lot of conflicting opinions about the practicality of non toxic oil painting. In the end, I went with my gut instinct, which is to paint in acrylics, but to try to create paintings that look like oil paintings. I am planning to use acrylics for the remaining lessons in Chapter 7.

In this painting, I'm trying to emulate the alla prima approach from Carol Marine's her book Daily Painting.

Things didn't go to plan and I had improvise, but the painting is not a total disaster. It was a great learning experience and I'm looking forward to the next one. Lesson 39 is Alla Prima painting, so I'm going to find a simple landscape to paint. 

You can finds a playlist of 4 videos about this painting on my YouTube channel (My First Acrylic Painting). 

Sunday, 11 August 2024

Distant and Background Trees

Background Trees - Claudia Nice
Watercolour & Ink
Stillman & Birn Beta Series Sketchbook
11cm x 9cm (4.5" x 3.5")

Distant and Background Trees are the sixth and seventh topic in the Tree Techniques chapter of Creating Textures in Pen & Ink with Watercolor by Claudia Nice. It’s a few months since I’ve picked up Claudia’s book. An exercise from Liz Steel’s SketchingNow Watercolour on Location course inspired me to return. By chance, I’ve picked it up at almost the same point as I left off.

In an exercise about common landscape elements, Liz suggests studying how other artists paint and draw the subject. The first topic on the list is trees, providing the perfect opportunity to revisit Claudia's book.

Distant Trees - Claudia Nice
Watercolour
Stillman & Birn Beta Series Sketchbook
15cm x 14cm (6" x 5.5")

I made some notes about Claudia’s treatment of distant and background trees and tried to copy a couple of her examples. 

Middle Distance Trees - John Lovett
Watercolour & Ink
Stillman & Birn Beta Series Sketchbook
14cm x 11cm (5.5" x 4.5")

I also looked at advice from John Lovett. I studied his suggestions about trees in Textures, Techniques & Special Effects for Watercolor and Getting Started and tried to copy some of his examples.

Tree - John Lovett
Watercolour
Stillman & Birn Beta Series Sketchbook
15cm x 14cm (6" x 5.5")

I’m pleased to get back to Claudia’s book and intend to continue learning from her content.

Sunday, 21 July 2024

SketchingNow – Edges


Cakes – Hard v Soft Edges
Watercolour & Ink
Stillman & Birn Beta Series Sketchbook
14.0 x 20.3cm cm (5.5" x 8.0")

In March, I joined a group run through of Liz Steel's SketchingNow Edges course. I then fractured my shoulder and couldn't sketch for over a month, so I finished way behind the rest of the group. 

Woodchester Park Boathouse
Watercolour & Ink
Stillman & Birn Beta Series Sketchbook
14.0 x 20.3cm cm (5.5" x 8.0")

(If you watch The Crown, you may recognize this building as the Gordonstoun school changing rooms.)

The Edges course is about creating depth and interest in your sketches by developing an understanding of edges. This involves recognizing whether the edges you see are a change in plane or just a change in colour and whether the edges are hard or soft or strong or weak. Once you understand the edges you are seeing, you can then decide how to represent them and manipulate them to make your sketches more exciting. There are four lessons each with an indoor and outdoor exercise.

Fruit Bowl
Watercolour & Ink
Stillman & Birn Beta Series Sketchbook
14.0 x 20.3cm cm (5.5" x 8.0")

I’ve done the course before in 2018 (see SketchingNow Edges), but I've learned a lot more this time through. 

Local Larder
Watercolour & Ink
Stillman & Birn Beta Series Sketchbook
14.0 x 20.3cm cm (5.5" x 8.0")

As a next step I've joined a group run through of Liz's SketchingNow Watercolour on Location course  which started on the 19th of June, but I'm already behind and rushing to catch up because of recovering from this injured shoulder.

Dresser
Ink
Stillman & Birn Beta Series Sketchbook
20.3 x 14cm cm (8.0" x 5.5")
You can see a few more sketches in a video on my YouTube channel SketchingNow Edges - What Have I Learnt?

Sunday, 10 March 2024

SketchingNow – Watercolour


River Arrow
Watercolour and Ink
Moleskine A4 Watercolour Album

Since January, I’ve been participating in a Live Version of Liz Steel’s SketchingNow Watercolour course.  I've taken the course previously in 2019. You can see some of my sketches from then in these posts:

House Plant
Watercolour and Ink
Moleskine A4 Watercolour Album

Liz doesn't teach a traditional approach to watercolor. She uses it in a quicker and more spontaneous way, which lends itself to sketching on location. The course is structured so you can work through it at your own pace, but this year she ran a live version in which you work through the lessons with a group and Liz hosts a weekly live stream. 

Vegetables
Watercolour and Ink
Moleskine A4 Watercolour Album

Working through the course with a group has been motivating and adds an extra bit of encouragement to do the exercises. Seeing other people's work and hearing about what they've learned and found challenging is also helpful. 

Butcher Hill’s Lane
Watercolour and Ink
Moleskine A4 Watercolour Album

I'm building up some sketching momentum and this has encouraged me to join a group run through of Liz's Edges course which starts in mid-March. This is in preparation for her Watercolor on Location course which starts in June.

Still Life
Watercolour and Ink
Moleskine A4 Watercolour Album

I am studying Ian Roberts' YouTube videos (Ian Roberts Mastering Composition) in parallel to working on Liz's exercises. Most of these sketches have been influenced by his teaching on composition and shadows.

You can see a few more sketches and hear a bit more about my experiences with the course and my plans to develop my sketching skills on my YouTube channel SketchingNow Watercolour - What Have I Learnt?.

Sunday, 28 January 2024

Sketching From Nature

Lump of Moss
Ink and Watercolour
Stillman & Birn Alpha Series Sketchbook
14.0 x 20.3cm cm (5.5" x 8.0")

Since October 2023, I've been reading a section of the Curious Nature Guide by Clare Walker Leslie each week and using it as the inspiration for a sketching exercise. 

Rosemary
Ink and Watercolour
Stillman & Birn Alpha Series Sketchbook
14.0 x 20.3cm cm (5.5" x 8.0")

Using a prompt for what to sketch is helpful for a couple of reasons: 

  • It cuts down the time I need to procrastinate about what to draw.
  • It encourages me to try subjects I might not have otherwise chosen.


Early Autumn
Ink and Watercolour
Stillman & Birn Alpha Series Sketchbook
14.0 x 20.3cm cm (5.5" x 8.0")

The sketches have been of varying quality, but the results aren't that important. What matters is the time I've spent drawing and intently studying a subject. The pictures on this post are my favourites. You can see all 13 sketches on my YouTube channel (Sketching From Nature – Getting Started).

Lavender
Ink and Watercolour
Stillman & Birn Alpha Series Sketchbook
20.3 x 14.0cm cm (8.0" x 5.5")

My motivation for drawing at least one sketch from life a week is to make sure I keep training my hand eye coordination and the skills to accurately draw a subject. I want sketching from nature to be a reason to get outside and explore. I would like to become more knowledgeable and to develop a joyful appreciation of my environment. I'm keen to visually document my feelings about a place; the mood, the atmosphere and other things that a camera doesn't always capture. The sketches can then be a source of inspiration and reference material for paintings.